CousinDIY > > Celestial Stars and Moon Mobile
Celestial Stars and Moon Mobile
[addtoany]
Instructions
Tools & Other Supplies Needed
Print Moon and Star Pattern Page from Instructions
Pencil
Scissors
Flat Iron
Gold Glitter Spray Paint
Gold Acrylic Paint
Small Paint Brush
Measuring Tape
Heavyweight Paper (for printing pattern pieces)
Large Eye Sewing Needle
Techniques to Know
Tracing & Cutting
Basic Painting
Double Knot
Overhand Knot
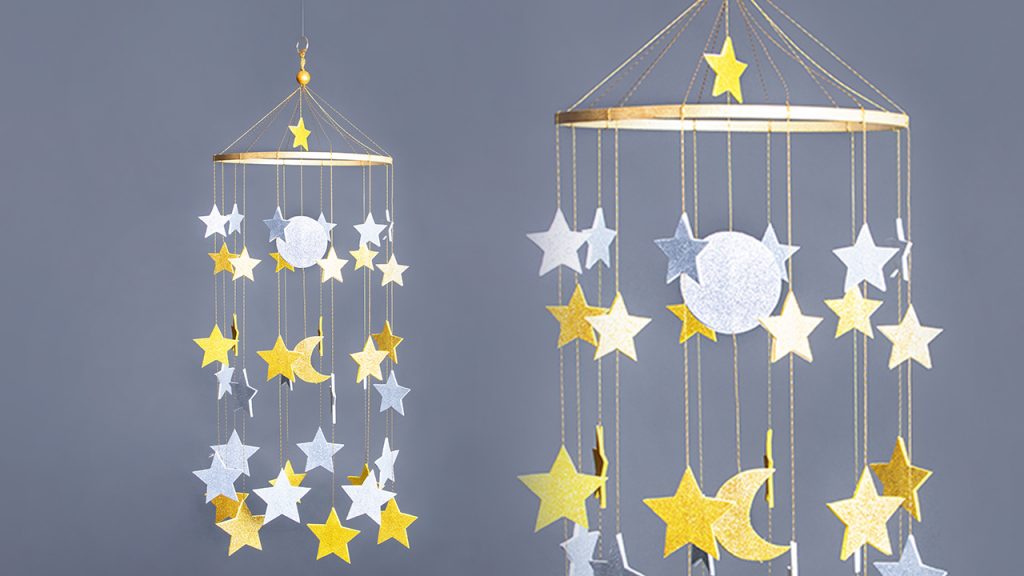
INSTRUCTIONS:
1. Paint the inner hoop of the 12” embroidery hoop with gold glitter spray paint and allow to dry. Paint a large unfinished wood bead gold. Allow to dry.
2. Find a small bottle, marker, etc. that measures approximately 1” in diameter. Wrap one end of the 20-gauge gold wire three times around that shape. Cut a 1” tail on each end. Wrap the ends around the triple wrap of wire and trim off any remaining tails. Set this wire ring aside.
3. Cut thirteen 4’ lengths of iridescent gold cord. Turn iron on, heat to polyester setting, and iron the kinks out of the cut lengths of cord. Set aside.
4. Print the moons and stars pattern page onto heavyweight paper. Cut out the pattern pieces.
5. Trace pattern pieces onto the back side of gold and silver adhesive back foam sheets and cut the pieces out so you end up with fourteen 2” gold star cut outs, twelve 2” silver star cut outs, twelve each of gold and silver 2 ¾” star cut outs, twelve each of gold and silver 3 ½” star cut outs, two silver full moon cut outs, and two gold crescent moon cut outs.
6. Choose two 3 ¼” gold, two 2 ¾” silver, and two 2” gold star cut outs. Lay the glitter side of one of the 3 ¼” stars down on your work surface so a point of the star is pointing up. Remove the adhesive backing from that star. Line the bottom of a 4’ length of iridescent gold cord onto the adhesive so the top of the cord passes through the top point of the star. Line the other 3 ¼” gold star up with this one (do not remove adhesive backing on this star) and adhere it to the first star so the glitter sides show on front and back of the joined stars. Measure up 6” and adhere the 2 ¾” stars to the cord in the same manner, then measure up another 6” and adhere the 2” stars to the cord in that manner. Set the cord of adhered stars aside. Repeat this step five more times for a total of six cords with the stars adhered to the cord in order.
7. Choose two 3 ¼” silver, two 2 ¾” gold, and two 2” silver stars. Repeat step 6 but with the 3 ¼” silver stars on the bottom, 2 ¾” gold stars next, and the 2” silver stars on top. You should end up with a total of six cords with adhered stars in order.
8. Use a measuring tape to measure around the outside circumference of the embroidery hoop and place a pencil mark every 3 ¼” around the hoop. You will make twelve pencil marks.
9. Start with a cord of adhered stars from step 6. From the top star, measure up 6”, line the cord up with one of the pencil marks on the hoop, wrap the cord two times around the embroidery hoop, and tie the cord off with a double knot. Leave the tail hanging.
10. With a cord of adhered starts from step 7, measure up 3 ¼” from the top star, line the cord up the next pencil mark on the hoop, wrap the cord two times around the embroidery hoop, and tie the cord off with a double knot. Leave the tail hanging.
11. Repeat steps 9 and 10 until all the cords of adhered stars are tied onto the embroidery hoop.
12. Gather all the cord tails together and work them up through the hole in the middle of the gold painted wood bead from step 1. Set aside.
13. Using the same method used to adhere the stars onto the cord, adhere the gold crescent moons, silver full moons, and remaining two 2” gold stars, in that order, to the last remaining 4’ iridescent gold cord from step 3. (Leave approximately 5” in between).
14. Load the other end of the cord onto a large eye sewing needle. Bring the needle up through the middle of the cords you threaded through the hole in the gold wood bead in step 13. Arrange the top of the middle cord so the moons and stars on that cord hang down positioned in the middle of the embroidery hoop. Arrange the top ends of all the cords so the embroidery hoop hangs level. Use an overhand knot to tie the top tails of the cords into an overhand knot resting just above the gold wood bead.
15. Bring the tails through the gold ring from step 2. Use an overhand knot to tie the joined cord tails to the gold ring. Trim off the remaining tails.
16. Hang and admire your celestial mobile!
Get the Supplies
| Image | Name | Summary | Price | Buy |
|---|
| Cousin DIY 12 Inch Wood Craft Embroidery Hoop | High quality natural wood construction
Wooden embroidery hoop bundle measures 3 inches
Embroidery hoops have L brackets to allow you to work with any desired fabric thickness
Hoops provide even tension on all fabric edges
Perfect for embroidery, needlecraft, and quilting needs
Size: 12 inch Diameter
| $3.49 |
|
| 24ft Gold 20 Gauge Copper Wire | Take your design to the next level with this Gold 20 Gauge Copper Wire . Wire allows full control of shape and size, and a copper base provides a very sturdy finished piece. Use pliers or a wire jig to easily shape your ideas into reality.
| $2.99 |
|
| Cousin DIY Unfinished Wood Bead Mix | The Cousin DIY Unfinished Wood Bead Mix allows you the freedom to creatively design your own custom jewelry. The raw wood finish gives a natural and unique touch!
<LI>Raw wood material
<LI>Various sizes and textures
<LI>Great for jewelry making and other DIY projects
| $5.99 |
|
| Glitter Sticky Foam, 9 x 12 inch, 6 Pack Assorted Colors | Foam sheets are perfect for countless DIY projects and crafts!
Quality foam construction with precisely cut measurements
Foam sheets can be used in a lot of die-cutters as well as easily cut by hand with scissors, craft knives and more
Great for kids and adult art projects, crafts, framing, matting, scrapbooking, cards, and more!
Pack Includes (6) 9 x 12 inch Foam Sheets
2mm Thickness
Color: Natural
| $12.99 |
|
| Iridescent Gold Fashion Cord, 59 Ft. | Iridescent Gold Cord is perfect for jewelry making and arts and crafts activities. Create that special project or start a new piece! Cord is a necessity in most jewelry making and is always good to have on hand for your next idea!
| $0.99 |
|


 Beaded Spring Earrings
  Needlepoint Plastic Canvas Hemp & Pearl Handbag
  Mother’s Day Chenille Pipe Cleaner Flower Bouquet
  Spring Macrame Earrings